Monday, December 28, 2009

Chex Mix

I hope that all of you had a wonderful Christmas Day!
I know our house was crazy!
Hopefully we can enjoy the end of this holiday season with some relaxing!
This recipe is one that I have used before to give as neighbor gifts...
but it is also delicious to munch on during....oh, say...a new years eve party,
or an office party, or a football party, or a neighbor party, or just for yourself to enjoy!
Your options are endless really!
Chex Mix
1 cup karo syrup
1 cup sugar
3/4 cup butter
1/2 box rice chex
1/2 box wheat chex
1/2 box golden grahams
coconut, as desired
nuts, as desired

For the cereal, I usually use just the smaller boxes...I don't remember what size
they were, or if they have bigger sizes...sorry!
In a large sauce pan, melt the butter.
Add sugar and syrup.
Bring to a boil.

Boil for 2 minutes, stiring every so often!
****HINT...if you want soft chex mix, don't cook the whole 2 minutes.
I usually cook mine for 1 minute 50 seconds.

In a seperate, LARGE bowl, combine the cereal, coconut and nuts.
(I have used cashews.)
Pour syrup mixture over cereal mixture and stir until EVERYTHING is coated.
Allow to cool.

EAT!

Wednesday, December 23, 2009

Peanut Butter Cup Pie

I came across this recipe on another cooking blog....
and thought I would give it a shot.
And why not...I had to take a pie to the ward christmas party!
Let me just say...it was SO GOOD!
Do I say that too much?
It really wasn't too difficult..
the recipe was a lot like the cream pies that I had made prior.
I just won't talk about how I didn't measure the graham crackers and had to make
3 different crusts...all at 11:30 p.m.!
UGH!
So, if you don't want to deal,
I would suggest you just go and buy a graham cracker crust!
Whatever you do, please just at least TRY this recipe.

Peanut Butter Cup Pie

Pie Filling:
1/2 cup sugar
1 1/2 tbsp cornstarch
1/8 tsp. salt
1 1/2 cups milk
2 egg yolks
1 tsp. vanilla
3/4 cup creamy peanut butter
Chocolate Layer:
1/4 cup + 2 tbsp heavy cream
2 oz. semisweet bakers chocolate
Graham Cracker Crust:
1 1/2 cups graham crackers, crumbled
6 tbsp. melted butter

Preheat oven to 350*

In a small bowl, combine butter and graham cracker crumbs.
Press moistened graham crackers into a pie tin.
I like to take a small glass and use that to press the graham crackers into the tin.
Make sure that they are not too dry also, or else the crust will just crumble apart.
(Like I would know ANYTHING about that)
Bake for 7 minutes.
Allow to cool completely.

**This is a change that I made.
The original recipe called for these same ingredients,
but actually doubled what I told you.
I had enought for 2 complete pies with 3/4 cup cream and 4 oz of chocolate.
You will be fine if you decide to half it.
I just don't know what you would do with all the extra chocolate.
Next, pour the cream into a small sauce pan.
Heat until the cream comes to a simmer and remove from heat.
Add the chocolate and stir until melted and combined.
Pour the chocolate mixture into the pie crust.
I tilted the pin tin and kinda swirled the chocolate around
to make sure it completely coated the crust.
Please in the freezer for 30 minutes until chocolate is firm.

**It is a little cracked, because this was my 2nd pie crust..and it was
in the fridge for a day...or two.
Now, for the pie filling.
If you want to take a second to hop over here so you are reminded
how to make a cream filling.
It's basically the same thing.

The only difference..you add the peanut butter instead of the coconut.
Once the peanut butter is combined, pour into the chocolate coated pie crust.

Place in the fridge and allow to cool completely before serving,
at least an hour.
Top with Whipped Cream
and mini chocolate chips.
Just so you know, it was a HIT at the ward party!
**Merry Christmas...
I'm taking the weekend off!

Monday, December 21, 2009

Christmas Wassail

First of all, let me apologize.
This post will have no pictures.
Also, i'm not sure that a drink can
*technically*
be considered a dessert.
HOWEVER,
this recipe is SO good!
It makes me warm just thinking about it!
I did give it out as a neighbor gift a few years ago
if that counts.
And if you are having a family christmas party...
this would be something fun to do for it!
Hot Wassail
1 gallon apple juice
2/3 cup brown sugar
1/2 tsp. cinnamon
1 tsp. whole cloves
2 cinnamon sticks, broken in half
dash of nutmeg
dash of salt
1/2 cup tang powder
1/2 cup country time lemonade powder
2 quarts water
In a large crock pot, combine the dry ingredients.
Add the apple juice and water and stir until dry ingredients are combined.
Serve warm.
For neighbor gifts,
I put everything....except the brown sugar,
in a baggie.
I had a tag telling them what to add to it.
It really smelled good too!

Friday, December 18, 2009

Congo Squares...a success!

So...the first pan that I made...we did have some that turned out.
I decided that I would give it another shot.
With supervision.
My sister came over and helped me.
Actually, she just watched to see
what on earth it could be that I am doing
or not doing
to make these not turn out!!!
I also wanted to check and make sure that I had the right recipe.
That maybe I wasn't missing something.
I googled "congo squares"
It returend several different things.
Some recipes that were NO WHERE near what I had.
And there was one that was EXACTLY the same as mine...
EXCEPT
you used butter instead of the oil.
So...Allison suggested that since the oil recipe isn't quite so lucky..
maybe I should give the butter a shot.
Heck, at this point..
what's the worst that could happen?
Congo Squares
1 lb brown sugar
2/3 cup melted butter
3 eggs
2 3/4 cup flour
2 1/2 tsp baking powder
1/2 tsp salt
1 cup chocolate chips
1 cup nuts...*if desired
Preheat oven to 350*
This picture has oil.
DO NOT ADD THE OIL!!!
Use the butter.
USE THE BUTTER!
Mix the brown sugar, butter and eggs in a large bowl.
Slowly add the combined flour, baking powdered and salt.
Once all ingredients are combined,
add the chocolate chips and nuts.
Mixture will be thick. It's ok.
Spread evenly in a greased 12x18 pan.
Make sure it is not a jelly roll pan...those are bigger than a 12x18.
(Listen, i'm trying to help you so you don't make the same mistakes I have.)
Bake for 25 minutes.
**The sides ALWAYS turn out a little darker and more crunchy than the rest.
I usually just cut the sides off...about 1 inch around.
They do make excellent *cookie sticks* if you will...great for dipping in milk!
My sister and I did a taste test between the butter and the oil congo squares.
The butter ones had SUCH a better taste!
These really are good.
It's like a chocolate chip cookie, but in bar form.
I think I have finally mastered the congo square.
I feel better!

Wednesday, December 16, 2009

Proof that I am human...

So..my family has had thie recipe for a while and I remember my mom making it when I was younger.
There was a time...oh, i'd say about 8 to 10 years ago when I came across the recipe and thought...
I want to make these again! I haven't had them forever.
So...I pulled out my NEW pampered chef baking stone...
(because I was SOLD on them....and I had just bought the bar pan!)
I made them and put them in the oven and anxiously awaited the 25 minutes!

Well...25 minutes came and went and after an addition 10 minutes...and the top getting REALLY brown
I took them out of the oven and allowed them to cool a bit.
Being overly excited...I started cutting into them.
As I did...I discovered that they were SO.NOT.DONE!
Now...please remember
it had been about an hour.
And I thought these stones were supposed to be PERFECT!
All I can say is...I LOST IT!
I started saying things. .
(what's that other word for poop?)
I made a mess of the congo squares with the spatula.
At this point...my dad came in the room.
(his ears perked up when he heard me saying stuff like *crap*)
He asked me what I was doing...
why I was doing it..
you know, being a concerned parent.
About that time, my brother and sister were downstairs and they heard my dad and me *fighting*
(we really weren't fighting.)
So, they turned off the t.v. and were standing at the bottom of the stairs listening!
Anyway, you get the point...they didn't turn out.
I have never had the desire to make them again.
Until today.
I guess I have been filled with a false sense of hope.
I have been baking for 3 months now and everybody that has tried my desserts have really liked them.
So I starting thinking things like... "I'll try these!" "I think i'm ready!" "What's the worst that could happen?"
Well...I mixed everything together.
I poured them into the pan..(a different on this time)
And this is what happened!

I called my sister. (yes, the same one)
And sent her this picture..
Her response? "Oh boy."
I can feel my stomach starting to turn with anger.
I am taking a deep breath.
What to do?
I can either bake it like that or do another half batch.
Well, I need the whole sheet for neighbor gifts.
So.....I make another half batch.

It doesn't take a rocket scientist to realize that these are NOT the same!
I have NO IDEA what has happened.
I did EXACTLY half the recipe...(except the egg..how do you half an egg?)
My self esteem is starting to dwindle...
becoming taken over by anger.
I figure at this point...it's probably going to be *crap* anyway..let's just cook it!

Some really, REALLY funky things going on with this.
I have no idea...I just know that I have to make another batch.
And I just give up.
Maybe having kids has calmed me down a bit...
broken my spirit...so to say.
I did decide that I would still post this so that you know all the OTHER recipes that I have posted
really are possible to make...
even if you sometimes struggle,
like I do.
*Stay tuned for a follow up story and recipe!*

***Also, I now know how to half an egg! Thanks Google!

Monday, December 14, 2009

Hershey Kiss Cookies

Kisses anyone?


This recipe isn't quite as easy as the peanut butter cup ones...
but it is by no means difficult!
The only thing that I discovered that I did wrong was making the cookie part too big.
I ended up having a lot of kisses left over.
So I ended up making another 1/2 batch.
The directions said it would make 48 cookies....
and there are 48 kisses in a bag.
So..make sure you keep the cookie part of the cookie on the smaller end.
(my mini scooper was too big...can you believe that!)

Hershey Kiss Cookies

1/2 cup shortening
3/4 cup creamy peanut butter
1/3 cup sugar
1/3 cup brown sugar
1 egg
2 tbsp milk
1 tsp vanilla
1 1/2 cup flour
1 tsp baking soda
1/2 tsp salt

Preheat oven to 375*

Beat shortening and peanut butter until well blended.
Add sugars and beat until fluffy.
Add egg, milk and vanilla and mix well.
Slowly add flour, baking soda and salt.
Mix all ingredients until combined.
Make dough into 1 inch balls and roll in sugar.
Place on cookie sheet.

Bake 8 to 10 minutes.

Once out of the oven, press chocolate kiss into the center of each cookie.
They will ALL crack...don't worry about it!
Allow to cool a bit and then move them to a cooling rack.

Thursday, December 10, 2009

Reese's Peanut Butter Cup Cookies

My next recipe from my neighbor gifts is
REESE'S PEANUT BUTTER CUP COOKIES!

If I talk about how easy it was to make these cookies..
will my neighbors feel cheated?
At least they taste good...
I do have that going for me!
Reese's Peanut Butter Cup Cookies
1 package peanut butter cookie mix
ingredients as needed on package
oil, water and egg.
Preheat oven to 375*

In a small bowl, combine all ingredients.
I just used a wooden spoon to stir them together until all ingredients were moistened.
Using my small pampered chef scoop (again)
place dough into a greased mini muffin pan.

Bake as directed on package.
(I threw mine away and just don't remember...sorry!)
In the mean time....start taking the wrappers off your Reese's!!!

Once you cookie dough comes out of the oven

Take an *unwraped* p.b. cup and place it on top and centered cookie dough

take a clean..sanitized finger and press it into the cookie.

See....SO NOT HARD!
Allow cookies to cool for a bit before removing them to a cooling rack.

Get a glass of milk and give 'em a try!

Tuesday, December 8, 2009

Oatmeal Chocolate Chunk Bars

The first recipe I am going to share from my
'neighbor gifts'
is the Oatmeal Chocolate Chunk Bars.

I liked having it be a "bar" rather than a "cookie."
I figured it would make a lot more, and I could cut them into smaller pieces.
They really did turn out good.
When I make them again, however,
I won't add as many chocolate chunks as I did.
Don't get me wrong, I like chocolate chunks,
I just think there were too many in this recipe.
Let me also tell you, that the original recipe is for a 9 x 13 pan.
So, I did double the recipe...hense doubling the chocolate chunks.
Give it a try, and tell me what you think!


Oatmeal Chocolate Chunk Bars

I'm going to give you the doubled recipe...
remember to cook it in a 11x17 bar pan!

3 1/2 cups flour
1 1/2 tsp. baking soda
1/2 tsp. salt
2 cups oatmeal (i used regular, not instant)
1 1/2 cups butter, softened
1 cup sugar
1 cup brown sugar
2 eggs
2 tsp. vanilla
12 oz. semi-sweet chocolate chunks (this is NOT doubled!)
1 cup chopped nuts (if desired, which I didn't!)

Preheat oven to 375*

In a seperate bowl, combine all dry ingredients and set aside.
In a large mixing bowl, beat the butter, sugars, egg and vanilla until fluffy.
Add dry ingredients slowly until well incorporated.
Add chocolate and nuts.

Pour onto a greased pan.
I *technially* didn't pour them, because they were way to THICK to pour.
So, I guess it would be....DUMP the mixture onto a greased pan.
PRESS into pan.

Bake for 18 to 20 minutes.
Mine were just a little dry...so make sure you don't overbake them.
Also, I wonder if that has anything to do with the kind of oatmeal I used?
HMMMM....?
They were still really, REALLY good.
Would I post the recipe if they weren't?

OATMEAL CHOCOLATE CHUNK BARS

Sunday, December 6, 2009

Neighbor Gifts

This year, if it isn't obvious,
I decided to give out
BAKED GOODS
as a neighbor gift.
I thought that if I did it early enough,
people would actually eat it,
because they hadn't
*officially*
started their diet's just yet.
(or, maybe I did it early because i'm going to be out of town!)
ANYHOO!
If you live by me, and we are neighbors,
and I know you...
this just might be what you get!
(or have already gotten)
Oatmeal Chocolate Chunk Bars
Reece's Peanut Butter Cup Cookies
Hershey Chocolate Cookies
and Congo Squares.
***the congo squares are not pictured.
That story to be told at a later date...
Stay tuned this week...and part of next for the recipes!
Merry Christmas!!

Friday, December 4, 2009

Cream Pies

Does anybody need to make a pie for a christmas party?
I do!
This is what I am going to be making.
Cream Pies
2 cups milk
2 egg yolks
6 tbsp. flour
2/3 cup sugar
1/2 tsp. salt
1 tsp. vanilla
**and whatever filling you are going to use with the pie**
I like to make a banana and a coconut.
This will make enough for 1 pie.
If you want to make 2 pies, then you will want to double it.
Don't mean to state the obvious, but, well, you know.

In a large saucepan, combine the flour and sugar and salt.

Add the milk, a little at a time...
what you are going for is a paste.

Once you have a paste, and the milk and flour/sugar is all combined, add the egg yolks.

Mix those together, then add the rest of the milk, a little bit at a time.
It will be runny, but you can tell it is thick...if that makes any sense.
It probably doesn't, but just stay with me!
NOW, you are going to turn on the heat.
Start cooking on medium-high heat, stirring until it comes to a boil.
Once it is boiling, you will want to continue stirring until it is thick.

When it is to the consistency you like,
add the vanilla and stir until combined.
It was about 3-5 minutes of boiling time to get it to this.
If you have doubled the recipe, you will want to start with the banana filling.
I like to slice the bananas and layer them on the bottom of the pie crust.

Pour the cream over the bananas, just until they are about 1/2 inch from the top of the crust.

Add another layer of bananas on top of the cream, and push those into the pie.

Smooth the cream filling and there you have it!

Ready to go in the fridge until serving!

Now for the coconut.
You want to just add enough coconut until it is where you like it.
Probably just enough to have coconut in every bite, but not so you are
taking bites of coconut and no cream.
It also is going to depend on how much cream filling you have left over.

We probably added between 1/2 cup and 3/4 cup coconut.
Pour the cream into the pie crust, leaving about 1/2 inch of the top of the crust.
Refridgerate both of these pies before serving.
You want to serve them cold!

Of course, you need to top the with whipped cream!
I would take the extra step and make the whipped cream from scratch.
Don't want to top these HOME MADE PIES with cool whip,
not that there's anything wrong with cool whip,
but really, you went to all of this trouble!

I don't know what it is with family members wanting to be in the pictures..
but here's a shot of my Dad!
He's a great guy and has given me tons of tips with my blog,
so....Thanks Dad!

Wednesday, December 2, 2009

Mini Carrot Cakes

My neighbor Tonya is a pampered chef consultant.
It's where I get all my tools and gadgets that I love!
We also work together!
She gave me this recipe along with a sample, and I thought
I have got to post this!
My mom makes the best carrot cake,
and this was right up there with the taste.
But the difficulty level...so easy!
And you should know by now, if it's something mini...i'm there!

Mini Carrot Cake Cups

1 pkg yellow cake mix
3 tsp. allspice
2 eggs
4 tbsp vegetable oil
4 medium carrots, peeled and grated

Preheat oven to 350*

In a large bowl, combine the cake mix, allspice, egg and oil.
Combine until all the ingredients are wet.
Stir in grated carrots.
Using your mini scoop, place batter into a greased mini-muffin pan.
Bake for 11-13 minutes.
Once they are cooked, press in tops.
I used the end of a wooden spoon, because I did not have my mini-tart shaper
(from pampered chef...it was on order.)
You are doing this to make space for the cream cheese filling,
so go ahead and make the holes as BIG as you want!
Make these holes while still in the pan.
Cool for 5 minutes, then remove to cooling rack.
Now for the FILLING!
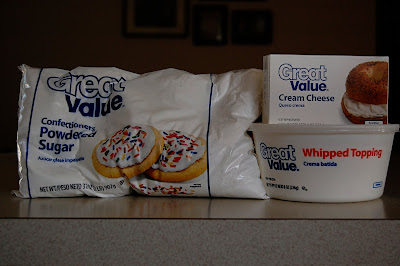
6 oz cream cheese, softened
3/4 cup powdered sugar
1 cup thawed cool whip
In a small bowl, combine ingredients with a hand mixer and mix until smooth.
Pour into a plastic bag, or using a cake decorator, pipe filling into cups.

I had my brother test these, and he said...
"Good, but you need more filling."
The boy loves sugar!
So, on all the other ones that I made, I had more filling on them.
You don't need to double the filling recipe..I had plenty!
Please, take a minute to make these!
I'm about 99.9% sure you won't be disappointed!